
Think a quick pat-down finds all ticks? Not usually.
Ticks hide in warm, tucked spots and can spread illness before you notice.
This step-by-step, head-to-tail inspection shows exactly how to check your dog for ticks, where to look, how ticks look at different stages, and safe removal basics.
You’ll get a simple routine you can do in bright light, plus what to watch for and when to call your vet.
No panic, just a reliable habit that protects your dog.
Step-by-Step Method to Check Your Dog for Ticks (Head-to-Tail Inspection)

Don’t just start patting your dog down in dim lighting. Move somewhere bright or grab a flashlight. If you’ve got a small dog, put them on a table so you’re not crouching. Bigger dogs can stand on the floor, but make sure the surface isn’t slippery. You need good light hitting every part of their body, especially the shadowy areas under the legs and belly.
Begin at the head and work backward in one continuous sweep. Use your fingertips to feel for raised bumps. Go slow. Head first, then neck, back, sides, rear, tail, all four legs (outside surfaces), belly, then the inside of the legs. While your hands move, part the fur in small sections so you’re seeing skin, not just coat. A flea comb can help push hair aside and get deeper into thick fur, but it won’t remove ticks. It just makes spotting them easier.
Pay attention to texture. Ticks feel like small firm bumps that shouldn’t be there. Some areas need extra focus because ticks crawl into warm, tucked-away spots where your dog can’t scratch them off easily. After you finish the full sweep, go back over any area that felt off or anywhere your dog’s been licking or scratching.
Identifying Ticks on Your Dog’s Skin and Coat
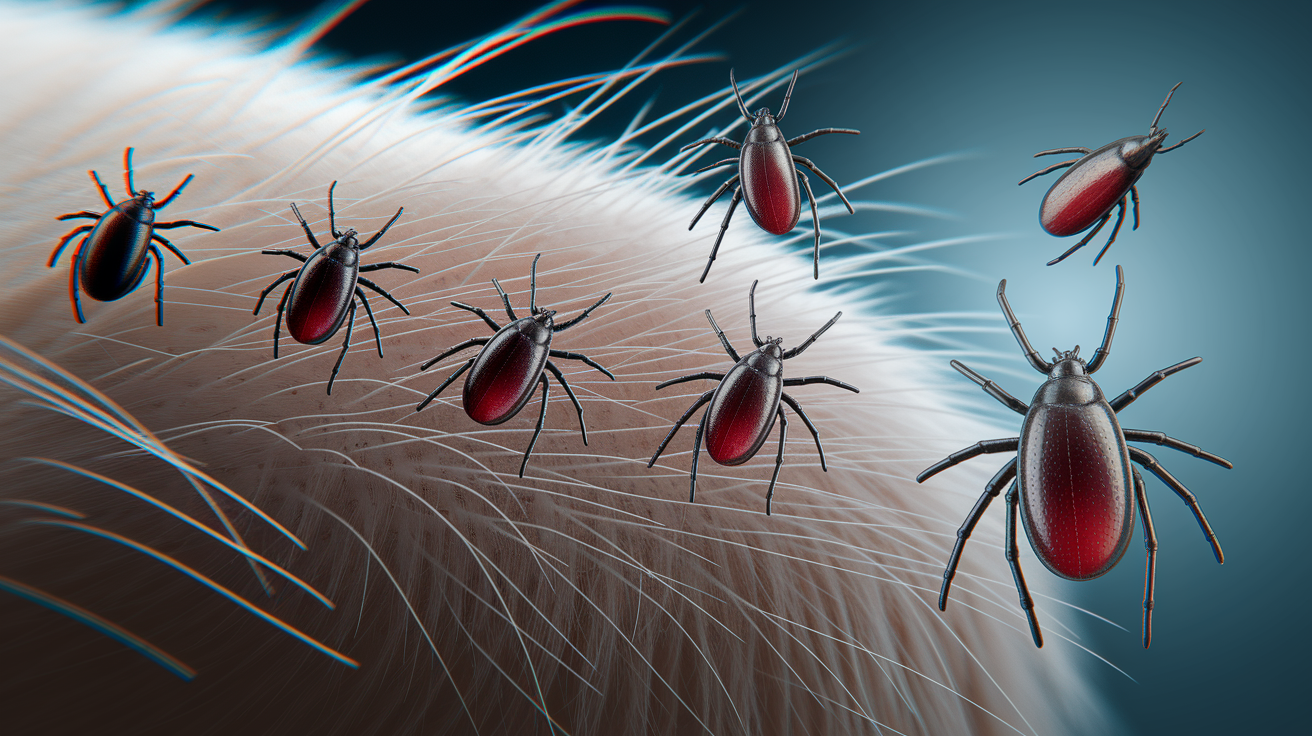
Ticks change shape depending on how long they’ve been feeding. An unfed adult tick is flat, oval, and dark brown to black, roughly apple seed sized. Once it latches on and starts feeding, it swells and turns pale grey. A fully engorged female tick can weigh up to 100 times more than when she attached, so something nearly invisible yesterday might look like a grey bean today.
Younger ticks are harder to see. Larvae are grain-of-sand small and have six legs. Nymphs are a bit bigger, about poppy seed size, with eight legs. Adults also have eight legs and are easier to identify once you know what you’re looking for, but nymphs are the trickiest because they’re tiny enough to hide and still transmit disease. If you feel a bump and it’s firm and oval, part the hair wider and look for legs. Ticks don’t move fast once they’ve attached.
Quick breakdown by stage:
- Larva – Grain-of-sand size, six legs, needs bright light to see.
- Nymph – Poppy seed size, eight legs, easily mistaken for dirt.
- Adult unfed – Apple seed size, flat and dark, eight legs visible.
- Adult engorged – Swollen, grey or pale tan, legs may be tucked under the body.
When you’re combing or feeling over your dog’s coat, stop at anything raised or darker than the surrounding skin. Ticks don’t wiggle after they bite down. No legs means it’s probably not a tick.
Differentiating Ticks From Skin Tags, Warts, and Nipples

Your dog’s skin has bumps that are supposed to be there. Nipples, moles, skin tags, warts. It’s easy to confuse them with ticks, especially on dogs with dark skin or loose folds. The fastest way to tell? Look for legs. Ticks have six or eight legs depending on age, and they’re usually visible if you part the fur and tilt your head to see the base. Skin tags and warts attach with a wide, fleshy base. Ticks attach with narrow mouthparts, so the body looks bigger than the connection point.
If you find a small round bump on your dog’s belly, count how many there are and check both sides. Dogs have nipples in two rows, symmetrical. Ticks show up randomly. If the bump is soft, movable, or has no legs, it’s not a tick.
Here’s the comparison:
- Tick – Visible legs (6 or 8), narrow attachment, firm oval body.
- Skin tag or wart – No legs, broad base, possibly soft or irregular.
- Nipple – Symmetrical placement, soft, same color as skin, no legs.
Not sure? Don’t pull on it. Take a photo and text your vet, or bring your dog in.
High-Risk Areas to Check Your Dog for Ticks
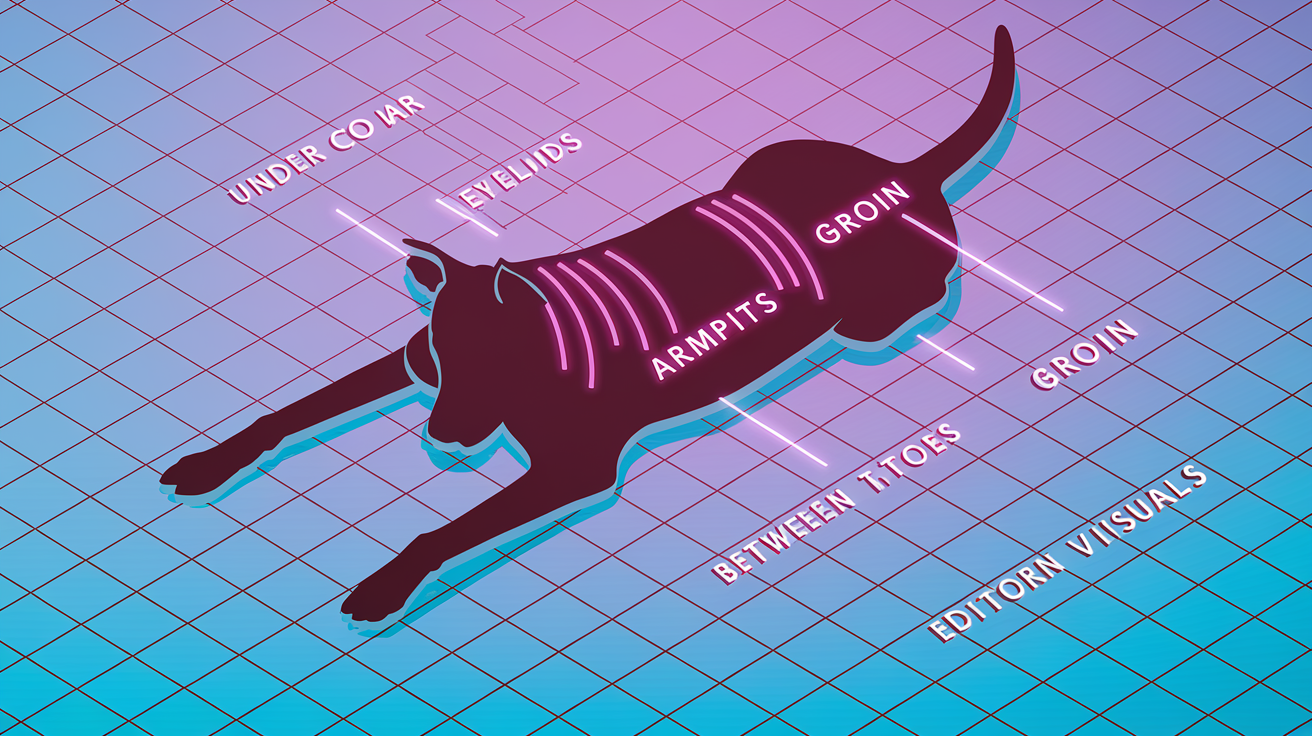
Ticks don’t attach randomly. They crawl up from grass or drop from brush, then move toward warm, protected spots where they won’t get scratched off. These zones need your full attention, even if the rest of your dog looks clean.
-
Head and ears – Check both ear flaps, outside and in. Fold them back and inspect the creases and the opening of the ear canal. Ticks love thin skin. If your dog’s been shaking their head or scratching one ear, that’s a clue.
-
Eyelids – Ticks on or near the eyelids get mistaken for warts or crusty discharge. Look closely at the edge of each eyelid and the corner where skin folds.
-
Under the collar – Ticks crawl underneath collars and hide for days. Remove the collar during every check and run your fingers over the skin, especially around the neck and throat.
-
Armpits – The dark, warm pocket where each front leg meets the body is a favorite. Lift each leg and inspect the skin in the armpit, front and back.
-
Groin area – Another warm, moist spot ticks seek out. Part the fur around the inner thighs and where the back legs meet the belly. Thick coats or your dog’s tail can hide ticks here.
-
Between the toes – Ticks squeeze into the webbing between toes and onto paw pads. If your dog is licking or chewing at their feet, check each toe.
-
Tail base and underside – Inspect where the tail connects to the back, then follow the underside toward the tip. Use a comb if the fur is thick. Ticks near the tail base are close to the anus and easy to miss.
When and How Often to Check Your Dog for Ticks

Ticks are active year-round in most of the U.S., but they get aggressive when temperatures stay above 32°F for more than 24 hours. Any warm spell in winter or early spring can bring them out. You can’t rely on the calendar.
Check your dog every day during warm months, and after every outdoor trip if you’re in an area with heavy tick activity. Even a short walk around the block or a few minutes in the backyard can result in a tick if your dog brushed past tall grass or low shrubs.
Simple frequency guide:
- Daily checks – If it’s consistently warm and your dog goes outside every day, check them every evening.
- After outdoor activities – Always check right after hiking, camping, playing in wooded areas, or walking through tall grass.
- Weekly checks in low-risk periods – If it’s been cold for days and your dog only goes out briefly on pavement or mowed lawn, weekly is a reasonable minimum.
- Increase checks after a warm snap – If the weather’s been freezing then suddenly warms up, ticks emerge fast. Check daily until temperatures drop.
Find and remove ticks before they’ve been attached long enough to transmit disease. That window can be as short as three hours for some infections.
Safe Tick Removal Techniques for Pet Owners
Once you find a tick, remove it immediately. Don’t wait until morning or until you can get to the store. The longer it feeds, the higher the chance it passes bacteria or parasites into your dog’s bloodstream.
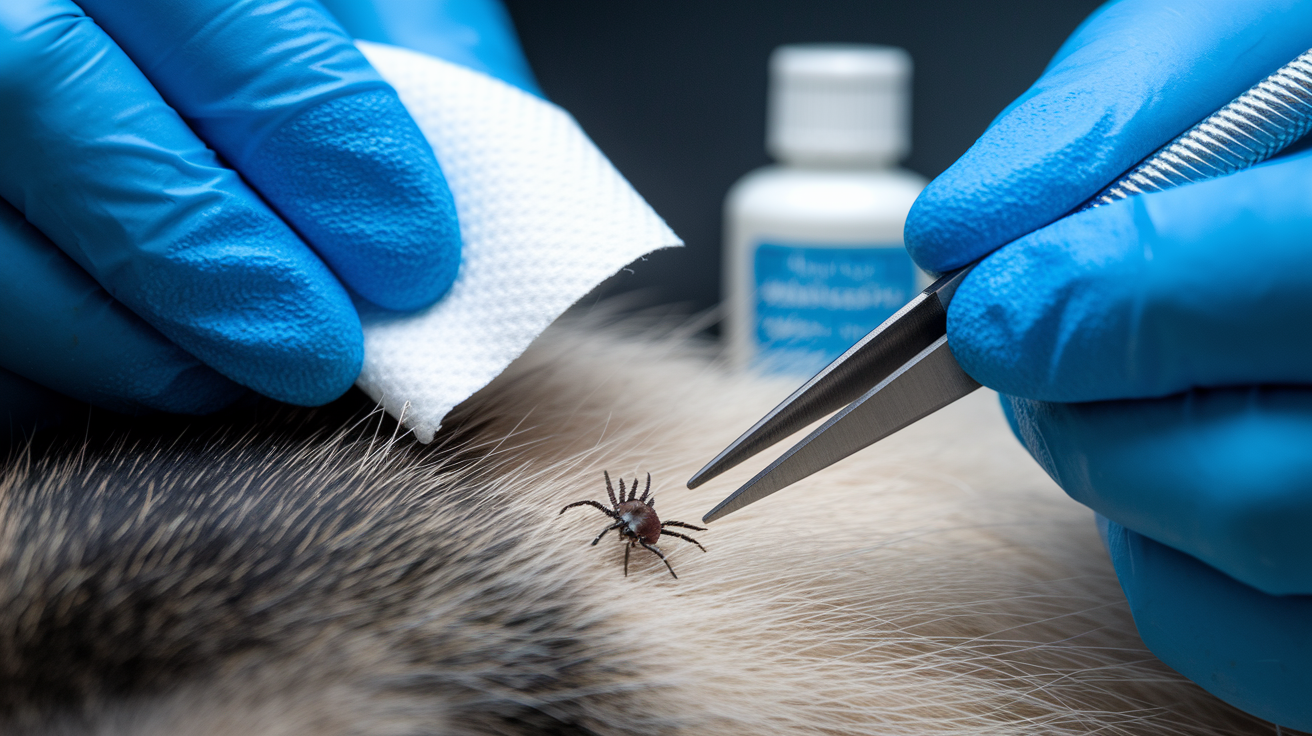
Before you touch the tick, grab fine-point tweezers or a tick removal tool like the Tick Tornado. Wipe the tips with rubbing alcohol or wash with soap and hot water. Disposable gloves help, but if you don’t have them, wash your hands before and after.
Part your dog’s fur so you can see exactly where the tick attached. Position the tweezers or removal tool as close to your dog’s skin as possible, right where the tick’s mouthparts enter. You want to grab the head, not the body. Squeezing the body can push infected fluid into the bite wound.
Step-by-step removal:
- Disinfect your tool – Wipe tweezers or remover with rubbing alcohol.
- Part the fur – See the tick’s attachment point clearly.
- Grasp the tick at the skin – Slide the tool under the tick’s body and grip as close to skin as you can.
- Pull straight up slowly – Use steady, even pressure. Don’t twist, jerk, or wiggle. Just pull straight up in one smooth motion until it releases.
- Inspect the bite – Check that the whole tick came out, including the head. Tiny dark specks still embedded may be mouthparts.
After removal, clean the bite area with a disinfectant spray. Vetericyn Plus Antimicrobial Wound Care Spray works well and doesn’t sting. Drop the tick into a small container or zip-top bag with rubbing alcohol to kill it, and save it in case your dog becomes ill and your vet wants to identify the species.
If you pulled gently and the mouthparts still broke off, don’t dig at them with tweezers. Call your vet. They may need to remove the pieces and prescribe antibiotics to prevent infection.
What to Do After Removing a Tick From Your Dog

Spray or wipe the bite with a pet-safe disinfectant, then wash your hands and the tweezers with soap and hot water. Don’t flush the tick or toss it in the trash where it could crawl back out. Keep it in a sealed container with rubbing alcohol, and label it with the date and the part of your dog’s body where you found it.
After you remove one tick, go back to that spot and continue your inspection from there. Ticks often travel in groups, or a second one may have attached nearby. Finish the full head-to-tail check before stopping.
Now watch your dog. Tick-borne diseases don’t always show symptoms right away, but many cause noticeable changes within days to weeks. The bite might look red or swollen for a day or two. That’s normal. What’s not normal is if your dog stops eating, becomes unusually tired, develops a fever, or starts limping.
Contact your vet if you notice any of these after a tick bite:
- Loss of appetite lasting more than 24 hours
- Lethargy or reluctance to move or play
- Swollen, painful joints or sudden limping
- Fever, panting, or shivering without obvious cause
Lyme disease, ehrlichiosis, anaplasmosis, and Rocky Mountain spotted fever all start with vague symptoms that look like your dog just isn’t feeling well. If you saved the tick, bring it to the appointment. Your vet may send it to a lab for species identification, which helps guide testing and treatment.
Preventing Ticks on Dogs Through Routine Care

Even the best tick preventatives don’t create an invisible force field. Ticks can still land on your dog, crawl around, and sometimes attach long enough to start feeding before the medication kills them. Some ticks have developed resistance to certain active ingredients, and others may bite before the product has fully absorbed or spread through your dog’s system.
Prevention is a combination of medication, grooming, and daily checks. Talk to your vet about which preventive is right for your dog. The choice depends on age, breed, weight, where you live, and how much time they spend outdoors. Credelio Quattro is a once-a-month chewable that protects against fleas, ticks, heartworms, roundworms, hookworms, and tapeworms, but your vet may recommend something different based on your specific needs.
Brush your dog’s coat regularly, especially after walks. Brushing won’t remove attached ticks, but it helps you spot them sooner and pulls out loose debris that could be hiding one. Check under your dog’s collar every few days, even if you’re using a tick collar, because ticks can slip underneath and attach where the collar sits.
| Preventive Type | Notes |
|---|---|
| Topical treatments | Applied to the skin, usually between the shoulder blades. Effective for 30 days. Some dogs experience skin irritation. |
| Oral medications | Chewable tablets given monthly. Work systemically. No mess or residue. Require a prescription. |
| Tick collars | Release active ingredients over several months. Must fit snugly. Check under the collar weekly for hidden ticks. |
| Natural options | Essential oils, herbal sprays, or dietary supplements. Effectiveness varies widely. Consult your vet before use. |
No prevention method is 100 percent effective on its own. Combine vet-prescribed products with daily inspections, especially during warm weather and after time spent in tall grass, brush, or wooded areas. Ticks are most active when temperatures are above freezing, but they survive mild winters and emerge on any warm day. Stay consistent even when it doesn’t feel like tick season.
Final Words
Start at your dog’s head and work to the tail, parting fur, using bright light, and scanning with your hands and a comb. This post walked you through prep, the head-to-tail flow, how to spot tiny and engorged ticks, safe removal steps, aftercare, and prevention tips.
Make a quick scan part of your routine after outdoor time. Practicing how to check dog for ticks helps you catch problems early. Save any removed tick, watch for changes, and call your vet if anything looks off. You’re on the right track.
FAQ
Q: What kills ticks on dogs instantly?
A: Products that kill ticks on dogs instantly include contact sprays and some fast-acting spot-on treatments, but no method guarantees immediate kill of an attached tick; remove attached ticks safely and check with your vet.
Q: How do you know if your dog has ticks?
A: You know your dog has ticks when you find tiny dark or swollen bumps, spot small legged insects, or notice increased scratching; part the fur and feel carefully under good light.
Q: Will my dog be ok if he has a tick?
A: Your dog may be okay with a single, promptly removed tick, but ticks can carry disease; watch for fever, limp, appetite loss, or lethargy and call your vet if any signs appear or removal was incomplete.
Q: How urgent is a tick on a dog?
A: A tick on a dog is often low urgency if found unfed and removed promptly, but urgency rises if the tick is engorged, your dog shows symptoms, or it’s a very young, old, or sick pet. Call your vet.